Getting started with the Xiaomi Mijia M365 Electric Scooter
If you have recently picked up an M365, I think you'll find you made the right choice. It's fun, easy to ride, and probably gives you the most for your money. Along with that comes some extra work, at least to have the best and safest experience. The Mijia is kinda like that fixer house— cheap, but renovate it here and there and you get a pretty solid place to live with some cash to spare.
So let's get started with several set-up tips and tricks to work on right out of the box. And after that, you really want to put money into upgrades. In this article I'll detail what I've learned after a year of regular riding.
Strengthen stem lock
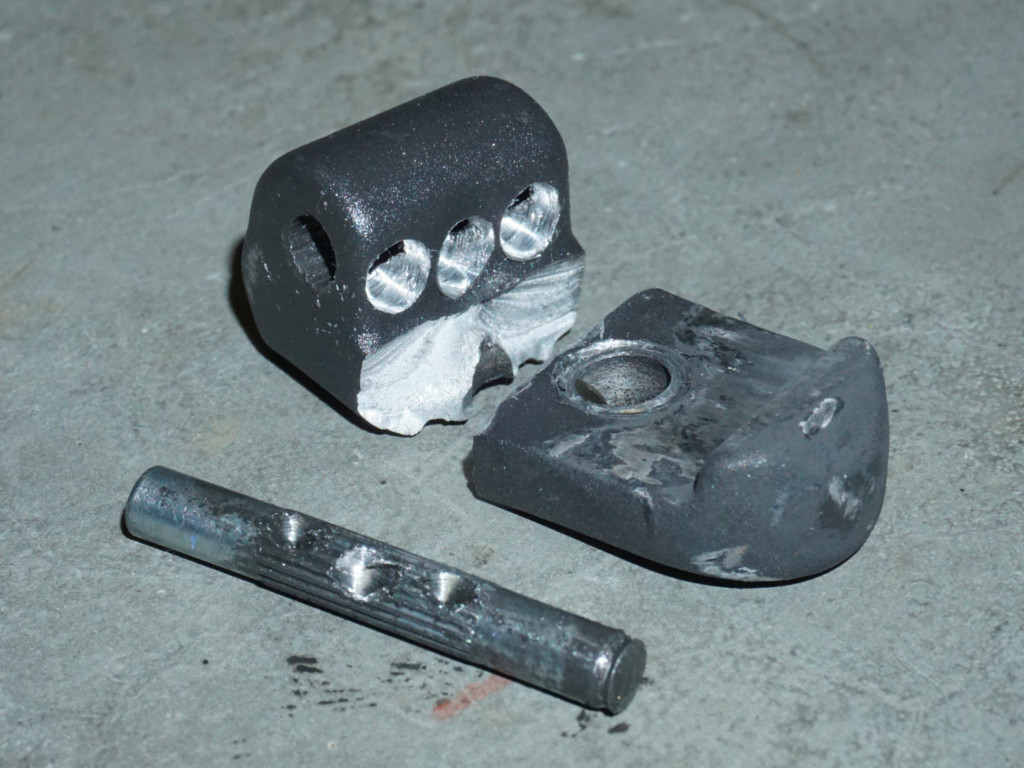
If there's one big shortcoming of the M365, it's the stem lock or the mechanism that allows the scooter to fold in half. The hook in this mechanism can crack after lots of opening & closing the scooter, not to mention bumps and rattling from riding. In fact, mine failed at about 650 km and just about sent me tumbling.
So this is an area where some aftermarket replacement parts are really worth it. See Reinforcing the Defective Xiaomi M365 Stem Lock.
Also note this procedure tends to fix the stem lock lever initially being really hard to unlock.
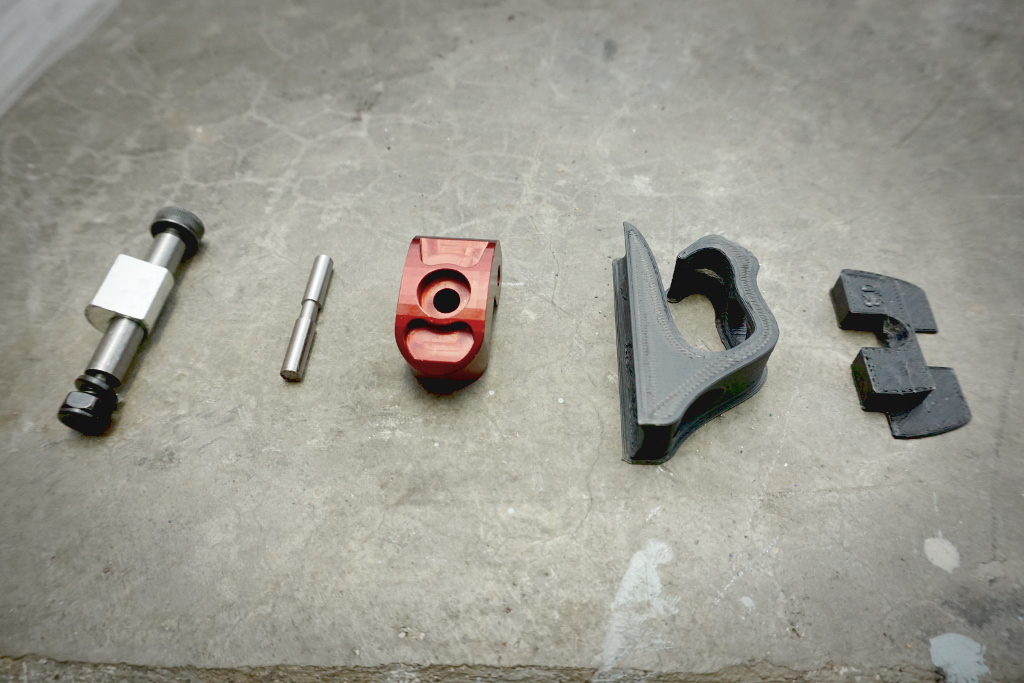
Eliminate all stem wobble/creak
You may have noticed the stem quickly develops a wobble and that the steel pin above the locking mechanism falls out. This is really not good and can be addressed by tightening down the hook, intalling an extra bolt through the stem, and using a plastic dampener.
I've gone into more detail about these fixes in Getting rid of all Xiaomi M365 stem wobble and creak.
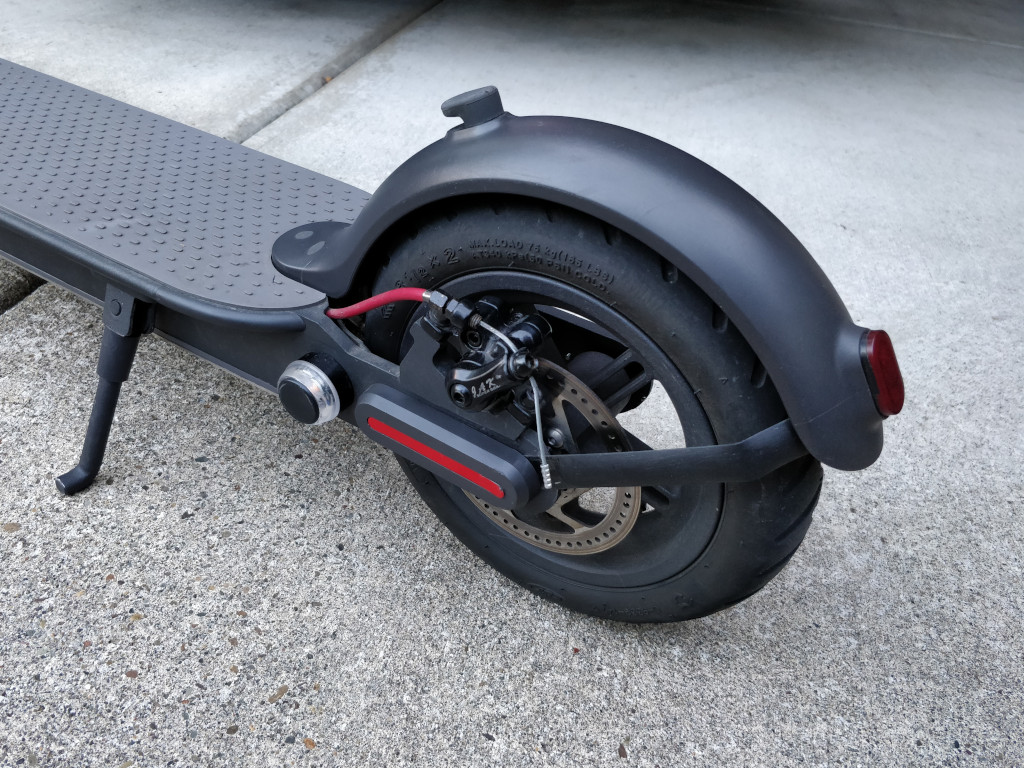
Adjust and improve braking
One feature that makes the M365 stand out from other scooters in its category is that it has a decent disk brake, though it requires calibration to actually be effective. If you haven't already realized, it engages at the same time as the motor brake when pulling the lever, which can feel jerky.
To really tune it, there are a few routes:
Calibrate the stock calipers. There are also slightly improved ones available from AliExpress. Often you need to tighten to the point of some rubbing to get them working well enough (see below).
Split out each brake into its own lever. That allows you to use the smooth hardware brake but still bring in the motor brake when you really need to stop. And you can buy a better lever with more travel.
Install hydraulic brake calipers and a bigger rotor. This is probably the best solution, but is also the most serious mod.
 |
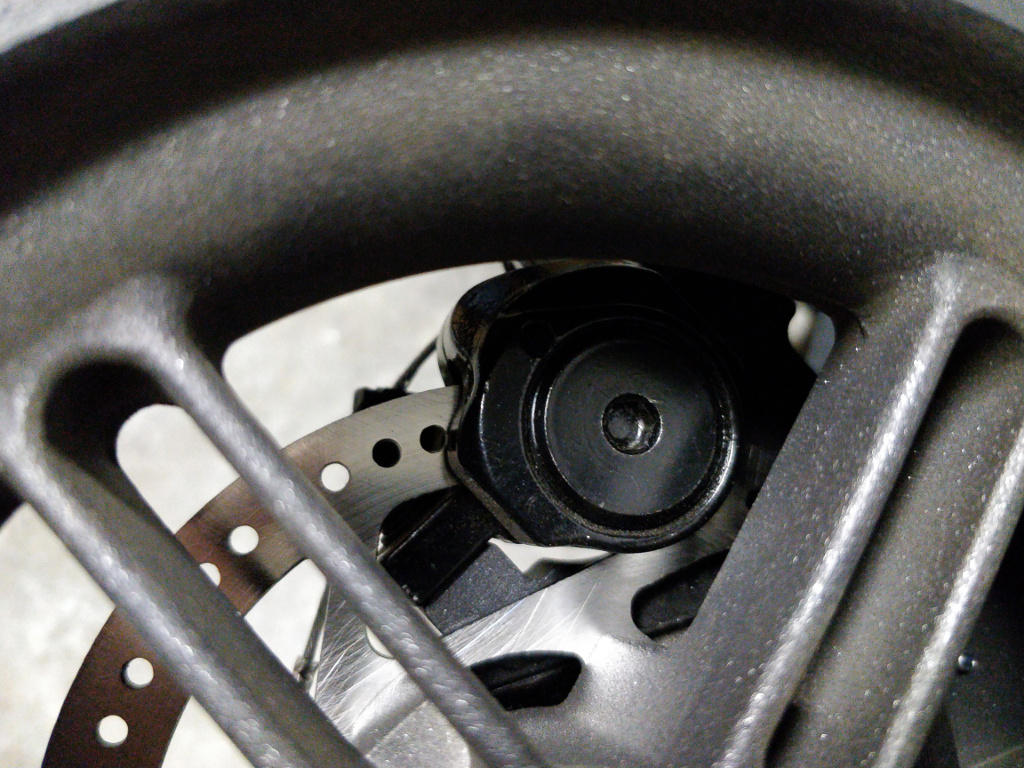 |
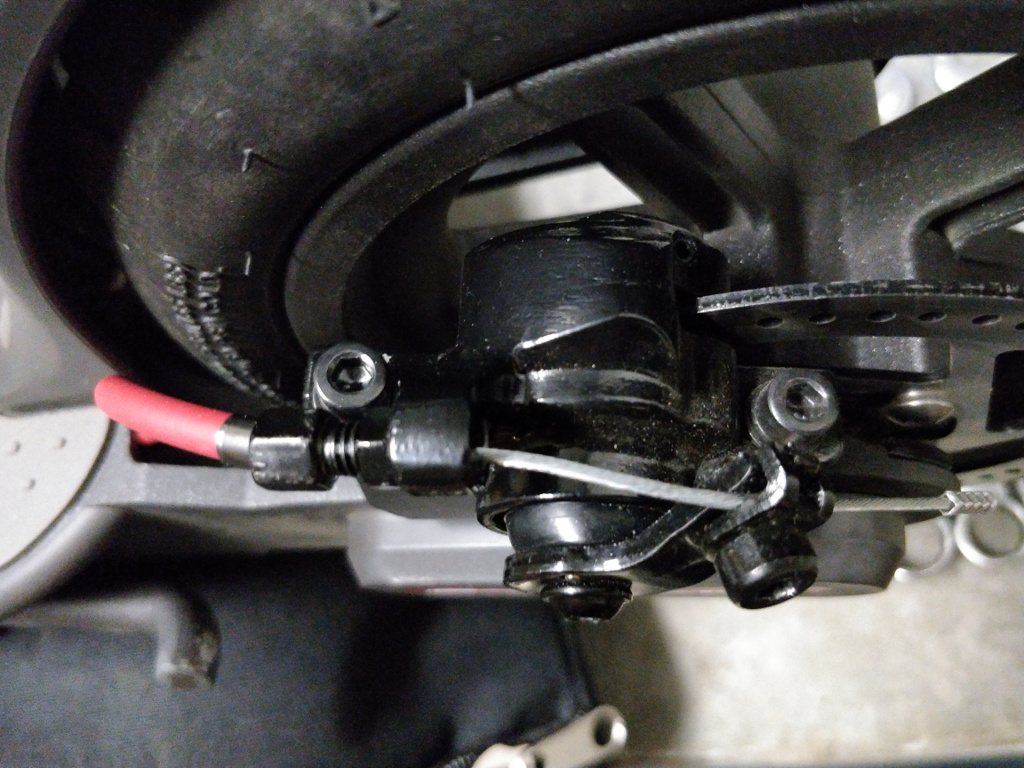
To adjust the caliper assembly properly (#1), you want the pads as close as possible to the rotor without rubbing too much.
I decided that some slight rubbing is actually fine. Between the possibility of being slightly warped and being at an off-angle, the assembly shifts over time while riding it such that this issue corrects itself. This makes the action as responsive as possible.
Prop the scooter up so you can rotate the rear wheel freely. While making adjustments, spin it and squeeze the lever as that can 'settle' the mechanism.
Then, you'll want to look at three adjustments. First, get the overall action tighter via the braking cable's clamp. This is not unlike any other disk brake adjustment.
Then, two screws mounting the whole assembly adjust the overall angle of the pads as they contact the disk. Try and get the close pad as close as possible to the disk without rubbing.
Lastly, bring in the rear/far pad by loosening the small set screw on the top of the unit and rotating the whole circular back pad.
To split out each brake (#2), purchase a right-hand mountain bike brake lever and slide it on the handlebar where there's a convenient gap. If you don't want to deal with any disassembly, you can choose a lever that opens up completely such as this one with the switch/wire taken off.
Otherwise, you have to slide off the rubber grip and unplug the throttle. To do that, take off the head unit's cover (where the power button is), pop out the rubber seal from the front cavity of the bar, and find the small connector behind the bluetooth unit (BLE). There are lots of photos and detailed tutorials out there for further help with this.
Once installed, it's just a matter of moving the cable over. The existing lever now only controls the motor brake and is looser. Use some rubber bands or an additional spring to retain some of the resistance given by the brake line.
If you still crave more effective and responsive braking, it's hard to beat the hydraulic caliper upgrade.
Support the rear fender
There are a few shortcomings of the rear render. The hook that secures the stem while folded has a rubber sleeve, but it can fall off and get lost. If you have some spray adhesive or superglue, put a drop/tiny spray of it on the hook. Slip the sleeve back on and evenly distribute by pressing it around.
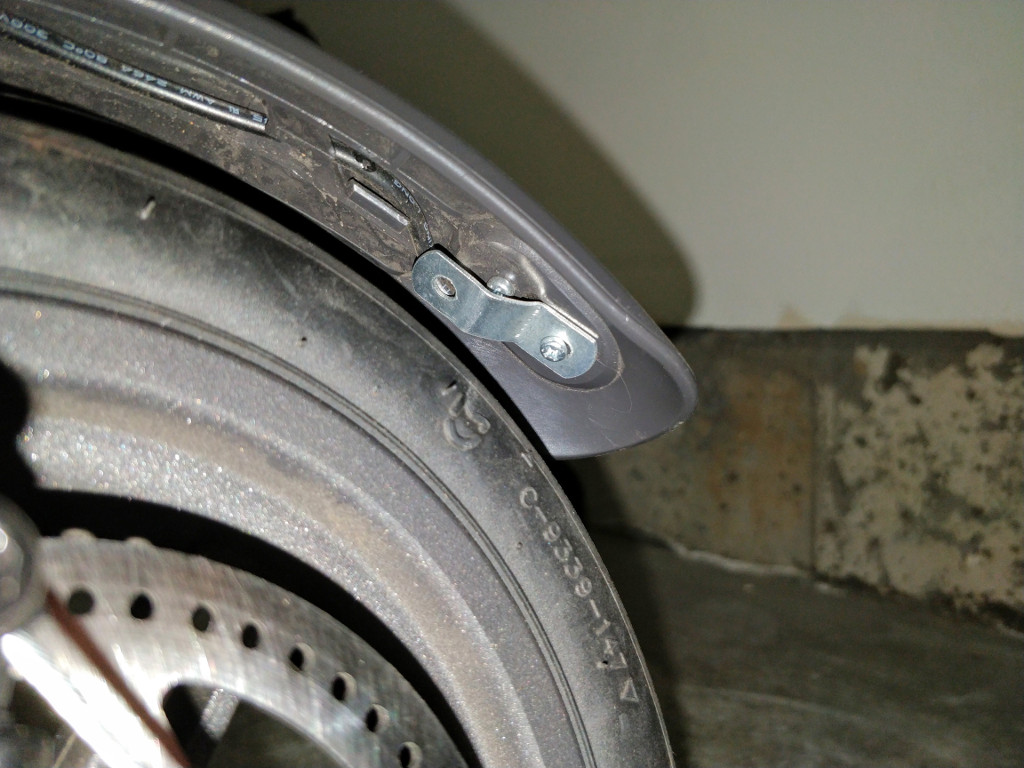
You may have also noticed how much the fender shakes around while riding. It will eventually snap off as a result -- see how mine started to crack.
 |
 |
To prevent that from happening, you can install a support bracket. I made one out of a piece of scrap steel that connects the backside of the brake light to the axis bolts of the wheel. Take a look at eBay for some plug 'n play options or try out Vilda's vastly improved part.
If you decide not to use the bracket, I suggest at least protecting the light wire. It can be damaged by the spinning wheel over time especially with all the bouncing around of the fender. Before I made my fender support, I used small scrap bracket to protect it, but many are using a 3D printed piece of plastic to do the job.
Think about tubes and tires
Invest in what separates you from the road. It doesn't matter how many other great mods you have when a flat knocks you out of commission. The M365 follows the design of a bike tube and tire, and is notorious for difficulty in replacing the tube.
Many turn to solid/honeycomb tires. I strongly suggest you do not go this route. Getting the tubes out isn't a walk in the park, but solid tires are even harder to install and also harder on the scooter overall. They sacrifice good traction, especially important when turning, as the actual contact point doesn't flatten slightly like ordinary air ones do. The harsher vibrations from riding could separate solder joints and crack parts in the folding mechanism and rear fender. It's worth dealing with tubes for a smoother ride, better grip with the road, and a longer lasting scooter.
The stock tires and tubes are thin and don't provide enough protection against sharp debris. You can upgrade both, and in fact increase the overall size too (see 10" tires later on). Short of that, what's saved me from flats for half of a year is swapping out stock tubes with thicker ones and lining the inside of the tire with anti-puncture tape, cut to the right circumference. I prefer tape to Slime as it won't make a gooey mess, and the protection seems more even.
Apart from these upgrades, the best thing you can do is keep your tubes inflated. Check them every two weeks. If you ride on flat tubes, at best you'll lose a lot of power and at worst the tire will start to pinch them and leave a ring of roughed up rubber. I have attempted to patch a tube like this which only led to more punctures opening up within this roughed up area. You could even have a catastrophic failure if your tube gets really bad.
Despite your best preventative efforts, it probably will come to a tube replacement or patch job eventually. Buy a patch kit, metal motorcycle tire levers, and spare tubes (note one front and one back). Standard bicycle tire levers won't give you enough leverage. Longer ones make changing the tube far easier.
Plenty of videos are out there to help you change the tube, but I'll share one key tip that made it all possible for me. When trying to get the tire back on, carefully wedge one of your motorcycle levers diagonally inward so that the tip presses against the wheel hub, the surface that the inner part of the tube presses against. Rock the lever slowly around, inserting each section of the tire into the hub while kind of prying it against that surface, taking care to contact the edges of the tire only and not the tube. You'll really need to put your arm into it!
Don't let the challenges of small wheels deter you from this scooter. With a little practice, it's not bad at all. It's all just so new to the world and techniques are still propagating. I find it absolutely approachable and a small price to pay for such great transportation.
Improve power & controls
The M365 heavily software-limited at stock. The modding community has produced a way to tweak the scooter's firmware to unlock extra power and acceleration. There are now also several refinements to the throttle and brake controls. Brief warning, however, that it's still only a small/cheap scooter and going more than 20 MPH (32 KPH) is dangerous. Be careful. Mod at your own risk.
There's a lot to know about the versions of M365 firmware, and several places now to produce it. These patchers continue to improve and mature, given how much potential there is for designing the ideal riding experience. The oversimplified history is that the original patcher, m365.botox.bz, was forked and improved by other parties. As a result there's a common footprint to all of them.
They operate identically: you'll get a file and flash it via bluetooth to your scooter via an Android app called M365 DownG. There is an iOS version too but it's still pretty new and has some limitations.
As you might expect, Xiaomi dislikes this and is engaged in a game of cat-and-mouse to shut it all down. When they release a new version, they make a new attempt to block further custom firmware flashing. So, some versions lock you in, meaning that the new version does not take effect if you flash a version different from your the current.
This is really just scraping the surface of the firmware side of M365 modification. If you're looking for a decent bump in speed and don't care too much for the details, have a look at my brief article about each firmware patcher.
Here is a brief intro to some common terms you'll see:
DRV: "Driver" or the main controller. Covers most of the important functionality of the scooter, so this is what you customize.
BMS: Battery Management System. Manages battery charging & discharging.
BLE: Bluetooth Module or the handlebar controller. Sits behind the power button.
CFW: Custom Firmware
DYoC: Do your own CFW
KERS: Kinetic Energy Recovery System. This is when your motor runs in reverse, effectively braking and slightly recharging your battery.
Rollerplausch: Large German community centered around the M365 but also escooters in general. They produce many awesome modding ideas and improvements, such as a stainless steel footboard cover.
Get a better HUD
One absolutely underrated improvement is the ability to see how fast you're going. There are now several options to add a screen next to your power button that can show you this useful information. The M365 Pro introduces a HUD faceplate that displays your current speed, mode, and battery level. It's now common to install it on the non-pro M365. Do an AliExpress search for "m365 pro screen" to order, and join the Telegram hacking group to learn how to do this.
Although the Pro screen is cheaper, Russian modders have developed much more advanced displays that show you speed, battery level, and other metrics. There is one that mounts as a faceplate and another that clamps to the side on the handlebar. I have the one that is the faceplate, and can certainly vouch for how awesome it is.
To order one, go to their Telegram group: Display for Xiaomi Mijia m365. Read the pinned message for instructions and the order form.
Consider 10" Tires
You can slightly increase the size of your tires for a softer ride. This is one of the most popular mods in the M365 community, though I have not tested it. I can only offer anecdotal information I've picked up along the way.
For the wheels themselves, it's just a matter of swapping out the tire. Sourcing it is a little tricky as there are many models that come close to fitting but not quite. I'd recommend Vilda's. You do not need a 10" tube, the 8.5" tube will work just fine.
I'm not enthusiastic about this mod because it requires sacrificing some acceleration and torque. These tires also alter your contact point between the tire and the road which can change handling characteristics. Some have reported less stable turning.
To make room for the larger tire, it also requires a flatter bolt under the front fender and a custom part to raise your rear one. That means manually lengthening your taillight wire.
I'm on the fence about whether I'm going to try this out, but leaning towards no. I would suggest taking a pass on 10" tires if hill-climbing ability is important to you. Otherwise, it could help out quite a bit with bumpy roads.
Other Cool mods to consider
Method to add blinkers, a horn, or any other 12V components: Xiaomi M365 Full Mod V3, or a minimal part list
Bag hook - Allows you to hang stuff off of your stem. Disclaimer— not good for heavy stuff for stability reasons and strain on the stem. But excellent for a lighter bag. Finding a good one is tough. There is a common popular model but I don't recommend it because it only mounts via one bolt and doesn't stay put. Look instead for a two-hole design. For example, this model is much more secure but is 3D printed and tends to crack. I don't have an awesome recommendation at the moment.
Carrying bag - Good for taking the scooter inside. Aliexpress
Metal battery cover - Protects against debris like nails that could hit your batteries. AliExpress.
Front suspension - AliExpress, though glance at my article about this type of knockoff suspension before buying. Ordering the Monorim version isn't as easy. Google 'Monorim M365'.
Sandpaper footboard - Several options on Aliexpress